


Nick Lewis is an editor at How-To Geek. He has been using computers for 20 years — tinkering with everything from the UI to the Windows registry to device firmware. Before How-To Geek, he used Python and C++ as a freelance programmer. In college, Nick made extensive use of Fortran while pursuing a physics degree.
Nick’s love of tinkering with computers extends beyond work. He has been running video game servers from home for more than 10 years using Windows, Ubuntu, or Raspberry Pi OS. He also uses Proxmox to self-host a variety of services, including a Jellyfin Media Server, an Airsonic music server, a handful of game servers, NextCloud, and two Windows virtual machines.
He enjoys DIY projects, especially if they involve technology. He regularly repairs and repurposes old computers and hardware for whatever new project is at hand. He has designed crossovers for homemade speakers all the way from the basic design to the PCB.
Nick enjoys the outdoors. When he isn’t working on a computer or DIY project, he is most likely to be found camping, backpacking, or canoeing.
Jump Links
-
What Do You Need Before You Get Started?
-
How Does Rufus Bypass the Windows 11 Hardware Requirements?
-
Why Doesn’t Windows 11 Support Every Windows 10 PC?
- What Does TPM 2.0 Do?
- What About Secure Boot?
-
Is Bypassing Secure Boot and TPM 2.0 a Problem?
Windows 10 has reached its end of life, and with it, millions of perfectly capable Windows 10 PCs run the risk of turning into e-waste due to Windows 11’s cumbersome hardware requirements. Fortunately, regardless of why your PC doesn’t meet the requirements, there is a quick solution.
What Do You Need Before You Get Started?
You don’t need much for this method—just three things.
- Rufus (Free and Open-Source)
- A 16GB (or larger) Flash Drive
- A Windows 11 ISO
You don’t even have to download the ISO manually if you don’t want to, Rufus can pull it directly from Microsoft.
How Does Rufus Bypass the Windows 11 Hardware Requirements?
Rufus is a free and open-source program that people have used for years to create bootable media, like USB drives, from ISO files.
When Windows 11 released, Rufus’s developers added the ability to bypass Windows 11’s hardware and local account requirements to the program. To do this, they made use of a file, “autounattend.xml,” which was implemented by Microsoft itself to allow Windows 11 to be quickly and automatically installed on multiple PCs without requiring a person to sit there clicking through all the options.
Autounattend.xml can also provide a series of registry keys that tells the installation process that it can ignore certain normal requirements, including TPM 2.0, Secure Boot, and the Microsoft account requirement, among others.
There is nothing “hacky” or suspicious about how Rufus operates, and you don’t need to worry that it will somehow compromise your security—everything is above board. You can even audit the code on GitHub if you want to be extra sure.
Using Rufus to Install Windows 11 on an Unsupported PC
To begin, download and install Rufus on your PC. You could also grab the portable version of the app if you want. You also need to download the Windows 11 ISO from Microsoft if you want to keep a copy for yourself.
Once Rufus is installed, insert your USB flash drive into a USB port on your PC. Pretty much any USB port will do, but I’d recommend a USB 3.0 port or better, since it’ll speed up the process a bit.
Once that is done, open up Rufus and click the “Select” button and pick out the Windows 11 ISO you downloaded previously.
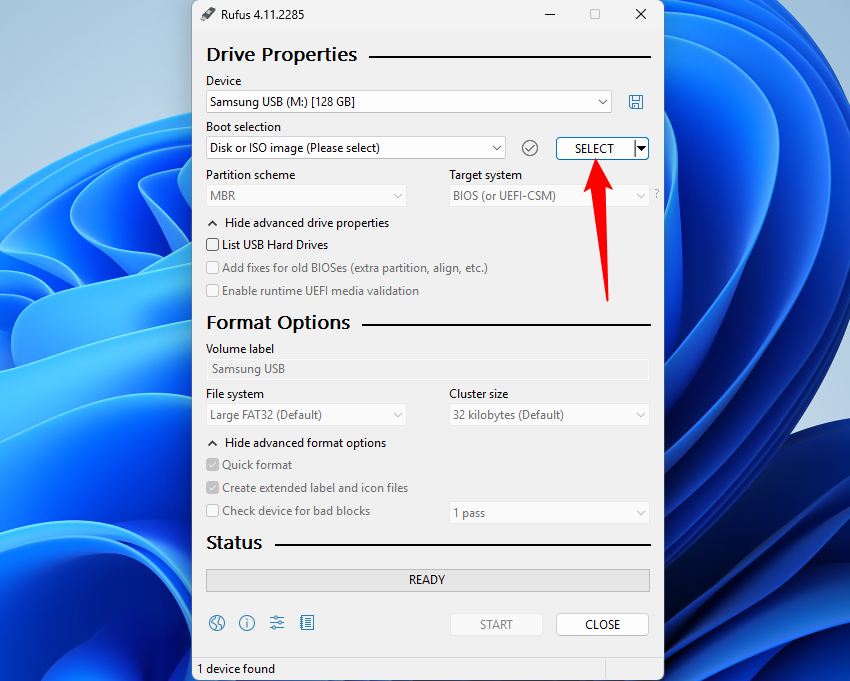
Alternatively, click the small arrow and hit “Download.” Rufus will prompt you to make a few choices about which build and language you want, then it’ll have you save the ISO somewhere.
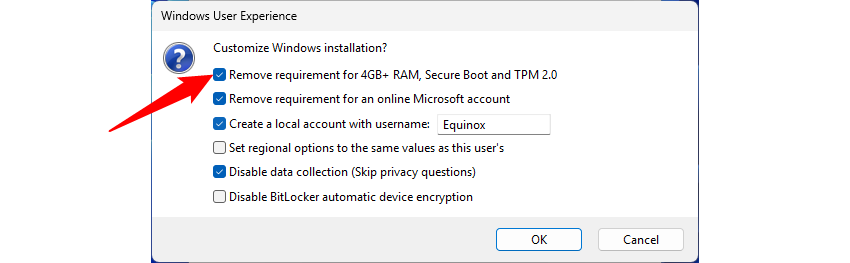
You probably don’t need to change any of the other settings here; they’ll do for most PCs. Click “Start,” then make sure to tick “Remove requirement for 4GB+ RAM, Secure Boot and TPM 2.0” at the top. I also disabled the Microsoft account requirement and data collection.
It could take a few minutes for Rufus to format the drive, but once it is done, you have a USB that you can use to install Windows 11 on almost any computer.
Just insert it, enter the UEFI (BIOS) to change the boot device to the USB drive, and follow the installer’s prompts. Best of all, this solution is permanently yours—it’ll keep working so long as computers are compatible with Windows 11, even if Microsoft patches the method that Rufus relies on.
Why Doesn’t Windows 11 Support Every Windows 10 PC?
Windows 11 imposes a new set of hardware requirements that are quite different from Windows 10. In most cases, the requirements just double. That isn’t likely to be a problem, since even most PCs from 2010 meet most of the requirements for Windows 11.
|
Windows 10 (64-bit) |
Windows 11 |
|
|---|---|---|
|
CPU |
1GHz Processor |
1GHz Dual-Core |
|
GPU |
DirectX 9 or Later |
DirectX 12 or Later |
|
RAM |
2GB |
4GB |
|
Storage Space |
32GB |
64GB |
|
Display |
800×600 |
720p |
|
TPM |
No |
TPM 2.0 |
|
Secure Boot |
No |
Yes |
However, here are two big ones that you’re likely to encounter problems with: Secure Boot and TPM 2.0.
What Does TPM 2.0 Do?
Trusted Platform Module, or TPM, is a security feature integrated into some CPUs, motherboards, or dedicated chips. The primary purpose is to handle certain cryptographic functions, which include things like generating and storing security keys, authenticating your device, and to help encryption software like BitLocker ensure that no one can simply steal your hard drive and read the data.
What About Secure Boot?
Secure Boot is a feature designed to protect your PC from malware (or some sophisticated cheating tools for video games) that runs when your PC boots. In short, it ensures that the only thing that can run while your PC is booting into Windows is Windows.
It is actually an excellent feature, but it can sometimes cause issues if you’re trying to dual boot Windows with another operating system, like Linux.
Is Bypassing Secure Boot and TPM 2.0 a Problem?
Potentially. Your computer won’t go up in flames because you’re running Windows 11 without Secure Boot or TPM 2.0, but you may encounter problems. Some games, like Battlefield 6 for example, require both Secure Boot and TPM 2.0 to be enabled. Valuable security features, like Windows Hello and BitLocker, will not work without TPM.
The more time goes on, the more likely you are to encounter programs that lean on TPM 2.0 to function properly.
Additionally, Microsoft could crack down on unsupported PCs at any time they want, which means you could suddenly find yourself with a PC that won’t receive any further operating system updates.
If that happens, you’ll be forced to try and manually install updates, or upgrade your hardware to something with the Windows 11 stamp of approval.

